
The Ultimate Guide to Budget Greenery & Pillar Candle Wedding Centerpieces
Planning a wedding involves countless decisions, and the centerpieces often feel like a significant budget hurdle. However, achieving a sophisticated and romantic ambiance doesn’t require breaking the bank. By strategically choosing greenery and pillar candles, you can create stunning, cost-effective centerpieces that wow your guests. This guide is your no-nonsense, veteran-led blueprint to crafting beautiful wedding decorations that are both budget-friendly and high-impact for 2026.
Why Greenery and Pillar Candles Are Your Budget Wedding MVP’s
Greenery and pillar candles are the undisputed champions of the budget-conscious wedding centerpiece for several key reasons. Firstly, greenery offers a lush, organic, and versatile aesthetic that can be adapted to almost any wedding theme, from rustic barn to modern chic. It provides volume and visual appeal at a fraction of the cost of abundant floral arrangements. Secondly, pillar candles bring an unparalleled warmth and romantic glow. Their simple elegance is timeless, and they are readily available in a wide range of sizes, colors, and price points. Together, they create a powerful visual statement without demanding a huge floral or decor budget. They are the workhorses that deliver maximum style for minimal spend.
Setting Your Centerpiece Budget: The Realistic 2026 Breakdown
Before you start pinning inspiration, you need a clear financial roadmap. For 2026 weddings, a realistic budget allocation for centerpieces typically falls between 5-10% of your total wedding budget, depending on the number of tables and your overall decor priorities. For a $30,000 wedding, this could mean $1,500 – $3,000 for centerpieces. If you’re aiming for a DIY approach with greenery and pillar candles, you can aim for the lower end, potentially even below 5%, by being savvy with sourcing and assembly. Expect to spend anywhere from $15-$40 per table for a well-executed DIY centerpiece, considering the cost of greenery, candles, holders, and any additional small decorative elements.
Sourcing Smart: Where to Find Affordable Greenery and Candles
The secret to budget-friendly centerpieces lies in smart sourcing. Your local wholesale flower markets are goldmines for greenery. Many offer weekend hours for the public or require a small business license (sometimes obtainable for a nominal fee) that can grant access to significantly lower prices than retail florists. Online bulk greenery suppliers are another excellent option, offering direct shipping. For pillar candles, big-box retailers, craft stores (especially during seasonal sales), and wholesale suppliers for event professionals are your best bet. Don’t overlook thrift stores for unique candle holders, which can add character and save money.
🧰 Tools & Gear You’ll Need
- Sharp floral shears or strong scissors
- Floral tape (optional, for securing stems)
- Wire cutters (for some greenery types or embellishments)
- Water source and buckets for hydrating greenery
- Gloves (to protect hands from sap or thorns)
- Candle snuffer and wick trimmer
- Drop cloths or old newspapers for DIY prep work
- A trial-and-error mindset!
Crafting Your Dream Centerpieces: A Step-by-Step How-To
Choosing the Right Greenery: Beyond Basic Eucalyptus
While eucalyptus is popular, exploring other greenery options can elevate your centerpieces and potentially save money. Consider varieties that offer interesting textures, shapes, and even subtle scents. For a truly budget-conscious approach, focus on volume and how the greenery drapes or fills space.
Budget-Friendly Foliage That Looks Luxe
Seek out options like Italian Ruscus (long, graceful stems), Sword Fern (full, rich green fronds), Pittosporum (small, glossy leaves), Myrtle (delicate, fragrant foliage), and even branches from non-flowering trees in your area (like certain types of willow or birch, ensuring they are dry and pest-free). Baby’s Breath, often considered a filler, can be used in larger quantities to create a cloud-like effect that looks incredibly romantic and costs very little.

DIY Greenery Prep: Maximizing Volume and Freshness
Upon receiving your greenery, immediately hydrate it. Cut about an inch off the bottom of each stem at an angle using sharp shears – this increases the surface area for water absorption. Remove any leaves that would fall below the waterline in your buckets. Store the greenery in a cool, dark place, misting it occasionally. If you have time, consider stripping some of the smaller leaves or breaking down larger stems into smaller, more manageable pieces to create volume for your arrangements.
Hydrate Greenery
Immediately upon arrival, recut stems at an angle and place in clean buckets with cool water. Remove any foliage that will be submerged. Store in a cool location.
Break Down Stems
For larger bunches, separate them into smaller, usable sections. This helps distribute the greenery evenly and creates a fuller look in your arrangements.
Trim for Arrangement
Before arranging, trim stems to the desired length for your specific centerpiece design and vessel.
Pillar Candle Selection: Ambiance Without the Burn
Pillar candles are key to that warm, inviting glow. Choosing the right ones ensures they burn cleanly and safely, contributing to the overall aesthetic without becoming a hazard or a mess.
Wax Types & Burn Times: What to Look For
For weddings, paraffin wax candles are common and affordable, offering a clean burn if good quality. Blended waxes (like paraffin with soy or palm) can also offer good burn times. Look for candles with a reputable burn time listed – for receptions, you’ll want candles that can last at least 4-6 hours. Avoid overly cheap, drippy candles that can create a mess and a fire hazard. Unscented candles are generally preferred for weddings to avoid clashing with food aromas or perfume.
Sizing and Placement: Creating Visual Harmony
Varying pillar candle heights and diameters on a table creates visual interest. A common approach is to use a trio of candles in slightly different sizes. Consider the scale of your table: taller candles might be suitable for larger rounds, while shorter, wider candles work well on rectangular tables or when interspersed with other elements. Ensure candles are placed on stable, heat-resistant surfaces and are not too close to flammable materials like greenery or fabric.
Arrangement Techniques for Maximum Impact
How you place your greenery and candles is as important as the items themselves. Think about creating balance, focal points, and an overall cohesive look.
The “Less is More” Approach: Statement Pieces
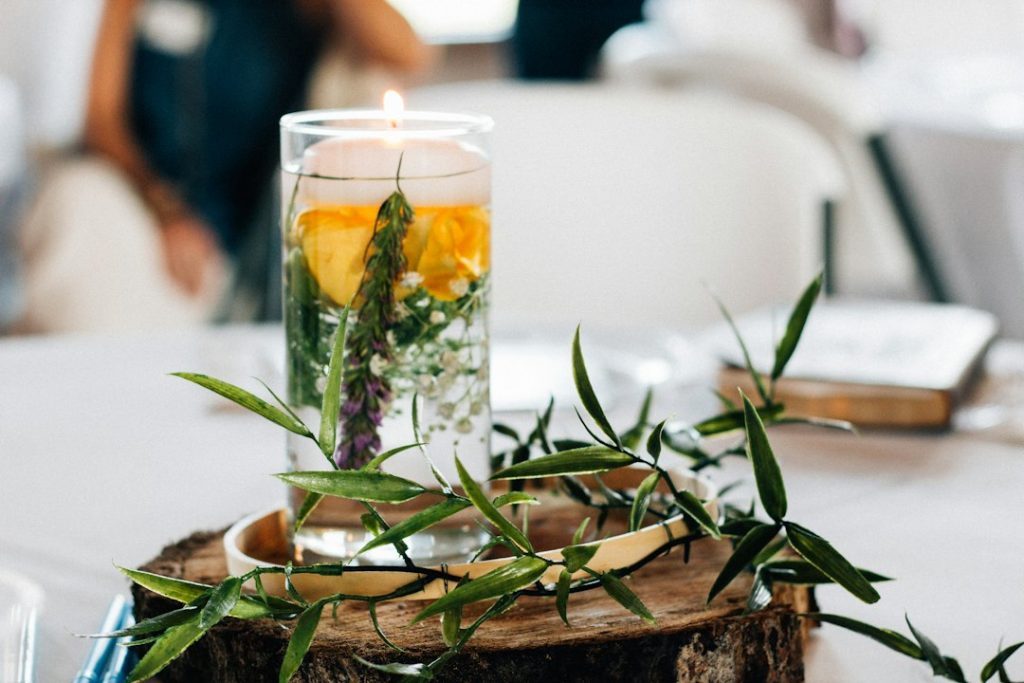
Sometimes, a single, substantial pillar candle surrounded by a beautiful cascade of greenery can be incredibly impactful. This works well for smaller tables or when you want a minimalist, modern look. The key is to use high-quality, abundant greenery to make that one focal point truly shine.
Cluster Power: Grouping for Density
Grouping several smaller pillar candles together, perhaps interspersed with sprigs of greenery, can create a dense, glowing cluster. This technique works well when you want to fill more space or create a strong candlelight effect. Ensure the cluster isn’t too tightly packed to avoid a fire risk.
Incorporating Candlesticks and Holders Creatively
Don’t be afraid to mix and match candle holders. Combining different heights, materials (glass, metal, ceramic), and styles can add depth and personality to your centerpieces. You can tuck small sprigs of greenery around the base of holders or even weave them slightly up the sides (ensuring they are kept away from the flame).
Select Your Base(s)
Choose your primary vessel or candle holder(s). This could be a single hurricane vase, a trio of candlesticks, or a low platter.
Place Candles
Arrange your selected pillar candles within or around your bases. Consider varying heights for visual appeal.
Add Greenery Strategically
Tuck and layer greenery around the base of the candles and holders. Avoid placing greenery directly above or too close to the flame. Let it drape naturally.
Add Embellishments (Optional)
If desired, add small touches like scattered petals, small stones, or fairy lights.
DIY Assembly: Putting It All Together
Essential Tools for the Budget DIYer
Beyond the basic cutting tools, having some floral wire, floral tape, and perhaps a hot glue gun (used sparingly and safely) can be helpful for securing greenery or attaching small decorative elements. Having a dedicated workspace with drop cloths is also key to managing the mess.
Step-by-Step Assembly Guide for Various Styles
Style 1: The Cascade: Place your pillar candle(s) in their holder(s) on your chosen surface (e.g., a low platter or directly on the table, if using a wide, stable base). Start layering greenery around the base, allowing some stems to drape downwards and outwards. Gradually build up the volume, ensuring the greenery doesn’t obscure the candle or get too close to the flame.
Style 2: The Cluster: Arrange 2-3 pillar candles of varying heights. Use greenery to fill the gaps between the candles and around their bases. Smaller sprigs tucked in can create a dense, cohesive look.
Style 3: The Minimalist Statement: Place a single, larger pillar candle in a striking holder. Surround it with just a few strategically placed, high-impact greenery stems that complement the candle’s form.

Creative Twists & Unexpected Greenery & Candle Pairings
Beyond the Obvious: Unique Greenery Options
Think outside the eucalyptus box. Consider dried grasses for a boho vibe, or even interesting seed pods and berries (ensure they are non-toxic and dry). Olive branches offer a Mediterranean feel, while magnolia leaves provide a rich, deep green with a beautiful underside. For a rustic touch, consider incorporating small, decorative pinecones or pieces of bark.
Candlelight Magic: Incorporating Color and Texture
While classic ivory and white pillars are versatile, don’t shy away from color. Deep jewel tones (emerald, sapphire, ruby) can add drama, while softer pastels can enhance a romantic theme. Consider textured candles, like those with a hammered finish or embedded elements, for added visual interest. Even metallic-dipped candles can add a touch of glam.
Seasonal Adaptations: Year-Round Budget Brilliance
For fall, incorporate elements like small gourds, dried leaves, or berries. Winter weddings can use pine sprigs, holly (carefully!), and perhaps metallic accents. Spring calls for lighter greenery and perhaps pastel-colored candles, while summer allows for vibrant greenery and perhaps touches of faux wildflowers.
Alternative Vessels: Elevating Your DIY Look
Move beyond basic glass holders. Consider vintage bottles, ceramic compotes, wooden crates, metal lanterns, or even repurposed tins for a unique look. These add character and can often be found affordably at thrift stores or antique markets.
Pro Tip:s for Flawless DIY Wedding Centerpieces in 2026
The Test Run: Practice Makes Perfect
This is non-negotiable. Assemble a complete centerpiece at home at least a month before the wedding. This helps you refine your technique, finalize your design, estimate the time needed, and identify any potential issues (like greenery wilting too quickly or candles fitting poorly). It also helps you create a detailed inventory list.
Gather All Materials
Lay out everything you’ll need for one centerpiece – greenery, candles, holders, tools.
Assemble the Centerpiece
Follow your chosen arrangement style, timing yourself as you go.
Assess and Adjust
Look at the finished piece. Does it meet your vision? Is it stable? How long does the greenery look fresh? Make notes for improvements.
Transporting Your Masterpieces: Logistics
This is where many DIY attempts falter. Greenery can wilt, and candles can shift or melt if not transported correctly. Use sturdy boxes or crates. For arrangements with loose greenery, consider assembling them at the venue. If assembling beforehand, keep them in a cool environment and transport them carefully, perhaps in large plastic bins with lids to maintain humidity and protect them from bumps.
Safety First: Candle Care on the Big Day
Ensure all candles are placed on stable, non-flammable surfaces, away from drafts and any flammable decor. Trim candle wicks to about 1/4 inch before lighting to ensure a clean, steady burn. Have a fire extinguisher or water spray bottle on hand at the venue, just in case. Brief your venue coordinator or designated helpers on safe candle practices.
Lighting Strategy: When to Light and How
Coordinate with your venue or planner. Typically, candles are lit shortly before guests are seated for the reception, or just before the reception officially begins. Ensure the person responsible knows to light them all systematically. Having extra long matches or a long butane lighter makes this process much easier and safer.
Common Pitfalls to Avoid with Budget Centerpieces
Overcrowding: When More Is Less
Trying to cram too much onto a small table makes it look cluttered and detracts from the elegance. It also leaves little room for guests’ plates and glasses. Focus on creating a balanced, impactful design rather than filling every inch.
Underestimating Greenery Needs: Running Out Last Minute
Greenery is often bought by the bunch or stem. It’s easy to miscalculate how many stems you’ll need per centerpiece, especially when dealing with different types and sizes. Always err on the side of over-ordering. Remember to account for some breakage or wilting during prep and transport.
Candle Mishaps: Uneven Burn or Waxy Messes
Cheaply made candles can burn unevenly, tunnel, or drip excessively. Investing in good quality, unscented pillar candles, and ensuring they are trimmed and placed correctly, mitigates these issues. Always use appropriate holders to catch any drips.
Forgetting the “Wow” Factor: Making It Memorable
Budget-friendly doesn’t have to mean boring. Even with simple greenery and candles, the “wow” comes from thoughtful arrangement, scale, and a cohesive theme. Add a unique vessel, a touch of metallic accent, or play with varying candle heights to create visual intrigue. The atmosphere created by warm candlelight is inherently magical.
FAQ: Budget-Friendly Greenery & Pillar Candle Centerpiece Queries
Q1: How far in advance can I assemble my centerpieces?
A: It’s best to assemble them no more than 1-2 days before the wedding, ideally closer to the event. Greenery is freshest when cut and arranged recently. Store them in a cool, dark place until transport.
Q2: Can I mix real greenery with faux elements?
A: Yes, but do so strategically. Use high-quality faux greenery for bulk or base elements and then add fresh, high-impact greenery (like eucalyptus or ruscus) for pops of freshness and visual appeal. Ensure the faux items look realistic.
Q3: What if my venue has a strict no-open-flame policy?
A: Opt for high-quality LED pillar candles. Many now have a realistic flickering flame effect and come with remote controls for easy on/off and timing. They offer the same ambiance without the safety concerns.
Q4: How do I ensure my greenery stays fresh for an outdoor wedding?
A: This is challenging. Assemble as close to the event as possible. Keep arrangements in water for as long as you can. Consider using floral preservative spray on the greenery and misting lightly with water throughout the day (avoiding direct spray on candles). Transporting them in climate-controlled vehicles is also key.
Q5: What’s the best way to incorporate candles of different heights safely?
A: Use stable candle holders specifically designed for the candle size. Ensure the base of the arrangement is wide and sturdy. Avoid placing taller candles where they might be easily knocked over, such as at the ends of narrow tables.