The Ultimate Guide to Smooth Chiffon Draping on Wedding Reception Ceilings
🧰 Tools & Gear You’ll Need
- Approximately 50-100 yards of high-quality chiffon fabric (depending on ceiling size and drape density)
- Heavy-duty step ladder or extension ladder (ensure stability and appropriate height)
- Sharp fabric scissors
- Measuring tape
- Thumbtacks or small nails for temporary securing
- Zip ties or strong, removable adhesive hooks (e.g., Command hooks rated for weight)
- Adjustable wrench or pliers (if using existing ceiling hardware)
- Gloves (to protect fabric from oils and dirt)
- A helper/assistant (highly recommended for safety and efficiency)
- Optional: Tension rods, fishing line, LED fairy lights, or other embellishments
Assess Your Ceiling Structure
Before a single yard of fabric touches the ceiling, meticulously inspect the rafters, beams, or existing hardware. Understand their spacing, material (wood, metal), and structural integrity. Identify the strongest points for attachment. This initial assessment is critical for both aesthetics and safety. Don’t assume; verify. Look for any signs of weakness, rot, or damage. Note the exact distance between attachment points you plan to use.
Calculate Fabric Needs
This is where many DIYers get it wrong, leading to insufficient fabric or awkward bunching. Measure the total length you intend to drape. For a simple swag, you’ll need roughly 1.5 to 2 times the length of the span to account for the sag. For fuller canopies, calculate based on the desired fullness per linear foot. Always err on the side of having too much fabric; it’s easier to trim than to wish you had more. For a standard 20ft span with a generous swag, plan for at least 30-40ft of fabric per swag. For complex ceiling treatments covering a large area, multiply this by the number of swags or panels needed.
Prepare the Fabric
Chiffon can be slippery and prone to static. If the fabric is new, consider pre-washing it on a delicate cycle with cold water and air-drying to pre-shrink it and remove any finishing chemicals. Inspect the fabric for any flaws, snags, or manufacturer defects. If necessary, trim raw edges or finish them with a serger or a rolled hem for a cleaner look, especially if the fabric will be visible from below. Lay the fabric out flat to identify the true length and ensure it’s free of wrinkles. A quick steam or iron on a very low setting (with a pressing cloth!) can help, but be extremely cautious as chiffon can scorch easily.

Plan Your Draping Pattern
Visualize the final look. Will it be a single central swag, multiple parallel swags, a crisscross pattern, or a full canopy? Sketch it out. Consider the overall aesthetic: romantic, modern, bohemian? This dictates the tightness of the drapes, the amount of fabric used, and the spacing of attachment points. For a classic swag, you’ll attach at two high points and let the fabric dip in the center. For a canopy, you’ll create a grid or a series of parallel lines. Think about sightlines – ensure the drapes don’t obstruct key views or essential lighting.
Secure Initial Attachment Points
Working with a helper is crucial here. Start at one end. Use your most secure anchor point. This could be a robust rafter, a pre-installed hook, or a securely fastened zip tie around a strong beam. If using adhesive hooks, ensure the surface is clean, dry, and suitable for the hook’s weight rating. Apply firm, even pressure. If tacking directly into wood, use the thinnest, shortest nails possible to minimize damage, and ensure they go into solid wood, not just plaster or drywall. Place the first attachment point slightly away from the end of the fabric to allow for tensioning later.
Drape and Pull Tension
With the first point secured, carry the fabric to the next attachment point. Here’s the art: pull the fabric taut enough to create a smooth line but with enough slack to form a graceful swag or ripple. Avoid pulling too tightly, which can distort the fabric and strain the attachment points. Avoid leaving too much slack, which results in a sloppy, uneven drape. Your helper is invaluable for managing the fabric’s weight and ensuring an even pull. Use temporary securing methods (like a tack or a clothespin) at the second point before committing. Adjust until the visual line is pleasing, then secure it permanently.

Continue Across the Ceiling
Repeat the process for each subsequent section. If you’re creating parallel swags, maintain consistent spacing between them. Use your measuring tape to ensure uniformity. If draping across a large expanse, it helps to work from the center outwards or from one side to the other in a methodical way. Always maintain even tension. If the fabric seems to be sagging unevenly, backtrack slightly and adjust the tension at the previous anchor point.
Secure the Final End
Just like the first point, ensure the final attachment is secure. Pull the fabric to achieve the desired tension and smooth out any major wrinkles before the final fastening. Trim any excess fabric, leaving a small amount for adjustments if needed. Ensure the end is neatly finished and doesn’t hang loosely.
Refine and Adjust
Step back and assess the overall effect. Are the drapes smooth? Is the tension consistent? Are there any unsightly wrinkles or bunching? Make minor adjustments to the tension at the anchor points or refasten if necessary. Gently smooth the fabric with your hands. This final check is crucial for that polished, professional finish.
Understanding Chiffon: Properties and Best Practices for Draping
Chiffon, typically made from silk, polyester, or rayon, is prized for its lightweight, sheer, and airy quality. This delicacy is its strength and its challenge. Its fluidity allows it to create soft, ethereal drapes, but its tendency to snag, wrinkle, and stretch requires careful handling. Polyester chiffon is generally more durable and less prone to wrinkling than silk or rayon, making it a popular choice for event draping. Understand the fabric’s weight – lighter chiffons are more floaty but harder to control, while heavier ones hold shape better but can look less delicate. Always source high-quality, bridal-grade chiffon for events; cheaper versions often lack the desired luminescence and may tear easily.
Essential Tools and Materials for Ceiling Draping
Beyond the fabric itself, the right tools are non-negotiable. A sturdy, reliable ladder is paramount. Ensure it’s tall enough to reach your highest attachment points safely. Avoid shaky, wobbly ladders at all costs. Heavy-duty scissors are needed for clean cuts; dull scissors will snag and pull the delicate fabric. For securing, a variety of methods might be necessary depending on the venue. Zip ties are versatile for beams, while strong, removable adhesive hooks (like Command hooks) work well on painted surfaces or smooth metal, provided their weight rating is sufficient. Thumbtacks or small nails can work for wood but are often less desirable due to potential damage. Always have more securing options than you think you’ll need.
Pre-Draping Preparation: Securing Your Wedding Reception Space
This phase is about protecting both the venue and your precious fabric. Clear the area beneath your draping zone of any furniture or high-value items that could be damaged by falling tools or fabric. Protect sensitive finishes on walls or floors if necessary. If you are drilling or using temporary nails, confirm with venue management and ensure you have a plan for repairing any minor damage afterward. Cover any lighting fixtures or other ceiling elements that you don’t want fabric draped over or potentially obstructed. Thorough preparation prevents costly mistakes and ensures a smooth installation process on the day.
Choose Your Anchor Points
Identify structural elements like ceiling beams, rafters, or existing sturdy hardware. Avoid suspending fabric from light fixtures, drywall anchors, or anything not explicitly rated for significant weight. If unsure, consult with the venue manager or a structural engineer. Mark your intended anchor points clearly.
Install Temporary Fasteners (If Needed)
For beams, wrap zip ties securely. For smooth surfaces, firmly attach adhesive hooks, ensuring they are rated for the expected weight of the fabric plus any embellishments. If using nails/tacks, ensure they are driven deep into solid wood.
Manage Fabric Handling
Wear gloves to prevent transferring oils from your hands to the fabric. Keep the fabric loosely rolled or folded to avoid unnecessary creasing until you’re ready to drape. Have your assistant manage the bulk of the fabric weight while you handle the attachment.
Drape with Controlled Tension
Start draping, pulling the fabric smoothly between anchor points. Aim for a consistent, gentle swag. Avoid overtightening, which strains the fabric and anchor points. Use temporary clips to hold fabric while you adjust tension before final securing.
Secure Fabric Edges
Once positioned, secure the fabric neatly at each anchor point using your chosen method (tying off zip ties, pressing hooks firmly, or using small tacks). Ensure no sharp edges or points are exposed.
Trim Excess Fabric
Neatly trim any excess fabric that hangs beyond the final secured point, leaving just enough for a clean finish. Avoid leaving long, untidy tails.
Inspect and Adjust
Step back to survey the draped fabric. Check for evenness, smooth lines, and consistent tension. Make any necessary minor adjustments. Gently run your hands over the fabric to smooth out small wrinkles.
Step-by-Step: Achieving a Seamless Chiffon Swag Across Rafters
This is the core technique. Start by identifying two strong points on opposite rafters that will form the ends of your swag. Securely attach one end of the chiffon panel to the first rafter using a zip tie or a strong hook. Ensure it’s anchored firmly. Now, with your helper managing the bulk of the fabric, walk to the second rafter. Pull the fabric taut enough to create a smooth, elegant curve, but not so tight that it looks strained or pulls the anchor points inward. The ideal swag has a gentle, consistent dip. Secure the second end. The key is achieving visual symmetry and consistent tension. If the fabric is bunching, you might be pulling too hard or the span is too short for the amount of fabric. If it looks too loose and wavy, increase the tension slightly.
Advanced Techniques: Creating Depth and Dimension with Chiffon
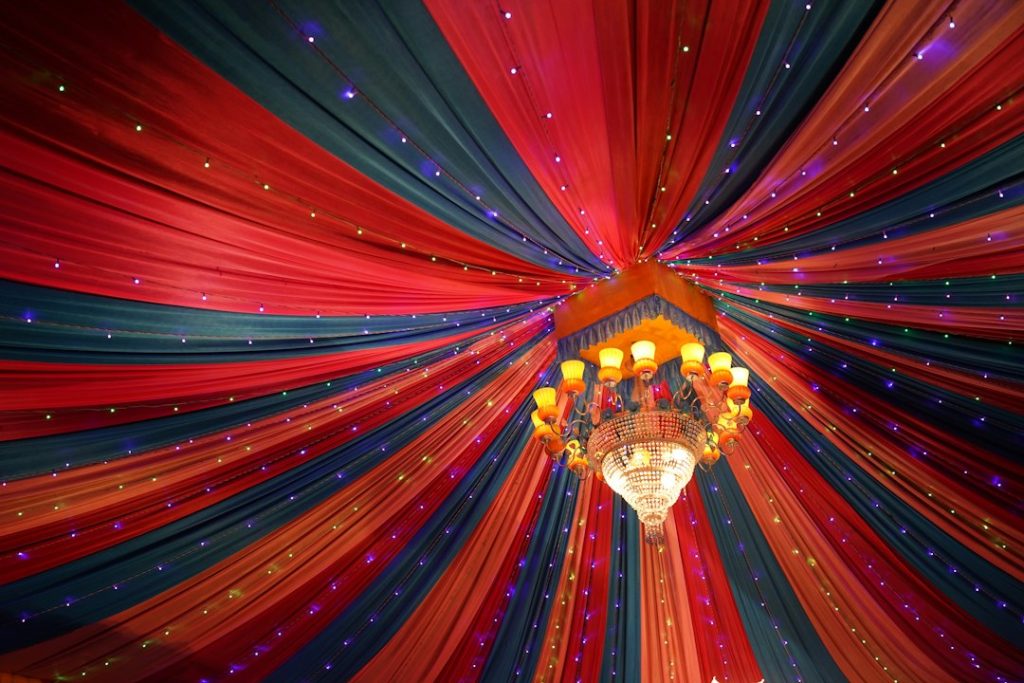
To elevate your draping beyond simple swags, explore layering. Drape multiple panels of chiffon side-by-side, varying the tension slightly on each to create subtle ripples and texture. You can also layer different colors or shades of chiffon for a richer visual effect. Consider creating a more complex canopy by draping fabric from central points outwards, or by using a crisscross pattern. Incorporating lighting is another advanced technique; weaving LED fairy lights or small spotlights through the chiffon can create a magical, illuminated effect. Tension rods can be used to create pockets or specific shapes within the draped fabric, adding architectural interest.

Troubleshooting Common Draping Challenges
The most common issue is uneven tension leading to sloppy or strained drapes. If this happens, don’t hesitate to undo and readjust. Another challenge is the fabric snagging on rough surfaces; always check your anchor points for splinters or sharp edges. Wrinkles are inevitable with chiffon; focus on smoothing them out during installation and consider steaming the fabric beforehand if possible (with extreme caution). Static cling can be a nuisance, especially in dry environments; a light mist of water or an anti-static spray can help. Finally, ensure your anchor points are truly secure. A falling drape is not only unsightly but a significant safety hazard.
Styling Your Chiffon Drapes: Lighting and Embellishment Ideas
Chiffon acts as a beautiful canvas for light. Weave delicate LED fairy lights (battery-operated are easiest) through the drapes for a twinkling effect. Uplighting from the floor, casting color onto the fabric, can create dramatic ambiance. For a touch of glamour, hang crystal strands, paper lanterns, or floral garlands from the draped fabric. Ensure any embellishments are securely attached and do not add excessive weight that could compromise the drapes or anchor points. Consider the overall theme – rustic weddings might incorporate greenery, while modern affairs could use geometric elements.
Real-World Examples: Stunning Chiffon Ceiling Installations
Rustic Barn Weddings: Bohemian Chiffon Swags
In a rustic barn setting, chiffon drapes soften the rugged architecture. Think relaxed, organic swags draped between exposed wooden beams. Bohemian styles often embrace asymmetry and a more “undone” look, so don’t be afraid of gentle, natural folds. Earthy tones or classic white chiffon work beautifully here. Pair with string lights or Edison bulbs for a warm, inviting glow. The key is to complement, not compete with, the barn’s inherent character.
Elegant Ballroom Receptions: Sophisticated Chiffon Canopies
For a grand ballroom, chiffon can create a luxurious canopy effect. Draping fabric from a central chandelier outwards, or creating intricate patterns across the ceiling, adds a layer of opulence. Crisp white or ivory chiffon is classic, but subtle pastels can also work. Ensure the draping is meticulously neat and symmetrical. Consider integrating crystal or pearl strands for added sparkle. This technique transforms a standard ballroom ceiling into a focal point.
Outdoor Tented Celebrations: Airy Chiffon Layers
Tented weddings are a natural fit for chiffon. Draping layers of light, airy chiffon from the tent poles and structure creates a dreamy, ethereal atmosphere. It softens the utilitarian nature of the tent and provides a beautiful backdrop for lighting. Consider draping in swathes or panels to create a sense of volume. Lighter colors work best to keep the space feeling open and bright, especially during daylight hours.
Safety First: Ensuring Secure and Beautiful Chiffon Drapes
Fire Safety Considerations for Fabric Installations
This is non-negotiable. All fabrics used in event spaces, especially those near lighting or heat sources, should be flame-retardant or treated with a flame-retardant spray. Verify that the chiffon you purchase meets fire safety standards (e.g., NFPA 701 in the US). Keep fabric clear of open flames, heat vents, and hot lights. Have a fire extinguisher readily accessible during installation and the event.
Weight Distribution and Hanging Point Integrity
The biggest risk factor is an anchor point failing. Chiffon may be light, but large quantities add up. Furthermore, wind (in outdoor settings) or accidental tugs can exert significant force. Distribute the weight evenly across multiple strong points. Use the load-bearing capacity of structural elements, not decorative ones. Double-check all knots, ties, and hooks. If using adhesive hooks, ensure they are rated for significantly more weight than you anticipate. A professional rigger is recommended for large or complex installations.
Professional Installation vs. DIY: When to Call the Experts
For small, simple swags in a familiar setting, a confident DIY approach with a helper is feasible. However, for large venues, complex designs, high ceilings, or if you have any doubts about structural integrity or safety, hire professionals. Event decorators and rigging specialists have the experience, equipment, and insurance to handle installations safely and efficiently. The cost is often justified by peace of mind and a flawless result. If the venue has strict rules or requires professional installation, always comply.
Chiffon Draping FAQ for Wedding Planners and Brides
Q: How much chiffon do I need for a standard-sized wedding reception hall?
A: It varies greatly depending on the pattern. For simple swags across a 20ft span, estimate 30-40ft of fabric per swag. For a full canopy, you might need hundreds of yards. Always measure and calculate carefully, adding at least 10-15% extra.
Q: Can I hang chiffon from ceiling tiles?
A: Absolutely not. Standard ceiling tiles have minimal structural support and cannot safely hold the weight of fabric. You must anchor to beams, rafters, or designated structural points.
Q: How do I keep the chiffon clean during installation?
A: Wear gloves, avoid eating or drinking nearby, and keep the fabric protected from dust and dirt until the last possible moment.
Q: What’s the best way to secure chiffon without damaging the venue?
A: Removable adhesive hooks (properly rated), strong zip ties around beams, or clamps that don’t mar the surface are good options. Always get venue permission before using any method that could leave a mark.
Q: Can I add lights to the chiffon drapes?
A: Yes, but use low-heat LED lights. Ensure they are securely attached and that the wiring is tidy and safe. Avoid overloading circuits.
Expert Tips for a Flawless Chiffon Ceiling Transformation in 2026
The secret to professional-looking chiffon drapes lies in meticulous planning and execution. Always prioritize safety – verify anchor points and use flame-retardant fabric. Measure twice, cut once, and always have extra fabric. Work with a patient assistant who understands the vision. Maintain consistent, gentle tension for smooth, flowing lines. Don’t underestimate the power of good lighting to enhance the fabric’s texture and color. Finally, step back frequently during installation to assess the overall visual impact and make adjustments. A well-executed chiffon ceiling can be the breathtaking centerpiece of your wedding reception, creating an unforgettable atmosphere of romance and elegance.